Home Guides and Articles
How to Start a Wood Fire

How to Start a Wood Fire

Fireplaces and wood stoves are a staple of many residential homes. But for many, the art of how to start a fire in these appliances is unfamiliar. While stoves and fireplaces were the primary way people heated their homes before central air furnaces were commonplace, these appliances are new territory for many. The sound and warmth of a real wood fire are difficult to match and often calls to mind thoughts of family gatherings and relaxing evenings. Building a wood fire in a fireplace or stove can become a frustrating experience for anyone not familiar with the proper methods. One common mistake people make is not knowing the difference between starting a fire in an open fireplace and starting one in a wood stove. These two groups of appliances require different skill sets.

How to Start a Fire in a Fireplace

One of the first things to consider when learning how to build a fire in an open fireplace are the varied fireplace configurations. The three most common configurations are:

  • Gas log lighter equipped fireplaces
  • Pre-fabricated fireplaces
  • Masonry fireplaces 

Masonry fireplaces without a log lighter can be built as "bottom-up" or a "top-down" type of fire. The configuration changes how to light a fireplace and we will discuss how to build a fire in a fireplace appropriate to each configuration below. 

Gas Log Lighter Fireplaces

Fireplaces that are equipped with a gas log lighter are the easiest to start. A gas log lighter works by routing a gas line into the bottom, left, or right side of the fireplace, which then connects to a specialized burner or log lighter pipe. The log lighter is usually made of cast iron or steel. The log lighter has a series of holes arranged in a row that releases the fuel gas under the fireplace grate, and into the fireplace. The gas that releases pre-heats the logs before they can combust on their own.

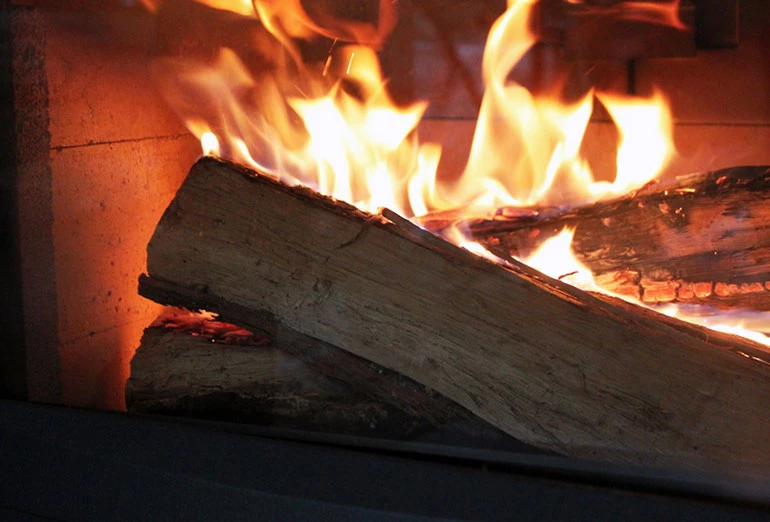
With gas log lighter fireplaces, setting the logs in a "log cabin" pattern is best. Logs, from six to eight inches in diameter, should be placed in the fireplace parallel to the front before adding a second layer of logs on top at a 90-degree angle. No more than two layers of logs should be used, no matter how tall the fireplace is. This is because stacking any higher can result in dangerous shifting of the logs as they burn down. Shifting logs that are stacked too high may not be contained by the log grate, resulting in the logs escaping the fireplace. Safety is the number one priority when lighting a fireplace of any kind.

How to Start a Wood Fire
Pre-Fabricated and Masonry Fireplaces

Bottom up fires (for prefabricated or masonry fireplaces without a log lighter) are fairly simple to start and maintain. These fires are best started with natural kindling, like small slivers of wood from fuel logs, softwood dimensional lumber cuttings, or small diameter twigs or sticks. The kindling should be dry and used in conjunction with loosely crumpled paper. Never use magazine or waxed paper with your kindling. The paper should be crumpled loosely and placed under the grate. Intersperse the kindling pieces among the crumpled paper, with the majority of it centralized beneath the grate. If you know your fuel logs to be properly cured and dry, they can be placed over the kindling in a pattern of your choosing before lighting the kindling fire. Whichever pattern is chosen, ensure that at least one inch of space is left between the logs to allow for oxygen flow.

If your fuel logs are not entirely cured, do not add them until the kindling fire has been lit and allowed time to be fully engulfed. This will allow for the kindling fire to become hotter by removing the flame impingement caused by unseasoned logs. The hot kindling fire can then more effectively boil moisture rapidly out of the logs after they are added. When adding logs, place one or two at a time and no more than three to four inches in diameter without a lot of bark in a log cabin pattern. If using a tall fireplace, consider placing them in a teepee pattern instead. Do not use any more than two layers of logs and keep all logs at least four to six inches from the walls for safety and air circulation. Before lighting the kindling, verify that the damper is open and the chimney is drawing properly.

Chimney draw can be verified by a simple smoke test. Using a rolled-up piece of paper, light the end, allow it to burn briefly, and then blow it out. Hold the smoking end directly below the open damper and verify that the smoke is pulled into the chimney readily. If smoke pools or rolls out of the fireplace, the issue will need to be determined before lighting the kindling fire.

How to Start a Wood Fire
How to Start a Top-Down Fire

Top-down fires (also for prefabricated or masonry fireplaces without a log lighter) are the most challenging of the wood configurations to ignite and initially maintain. However, the benefits of a top-down fire are that they allow for more efficient combustion and much longer burn times when started correctly. Top-down fires can be used in open fireplaces and stoves alike.

The idea of a top-down fire is a simple one. Rather than building a roaring kindling fire below the logs, which will quickly see them engulfed, the fire is completely inverted, with the kindling stack at the top of the fire. Start out with two or three larger fuel logs resting directly on the grate, then stack three to four smaller diameters logs perpendicular and directly on the large base logs. Last, build a kindling fire directly on top of the top layer of logs. Over time, the kindling fire will begin to burn downward toward the fuel logs. For those looking for a roaring fire right off the bat, this is not the ideal type of fire to build. The resulting fire from a top-down set up is meant to be efficient and will burn slowly. On average, it will be over an hour and a half before additional logs will need to be added.

How to Start a Wood Fire

How to Maintain a Fire in a Fireplace

As the life cycle of a fire proceeds, it is necessary to add additional fuel logs and rearrange the log stack occasionally. A high quality tool set that includes a hooked poker and scissor tongs is recommended. Only add two logs at a time, as this gives each log the optimal time to heat up and combust. Too many logs tend to suffocate the fire or give a slower burn with too much smoke. Make sure to keep fireplace and stove doors or screens open only when adding additional logs to allow for proper combustion. Although their initial start-up differs, adding fuel logs to a bottom-up and top-down fire is the same and only requires carefully placing fresh fuel logs upon the last remaining layer of existing logs.

Other Tips on Lighting a Fireplace

No matter what configuration you have, when lighting the log lighter or the logs, use either a long stick lighter or a match. When lighting a log lighter, position the already lit match or stick lighter just below the holes and turn the gas valve on immediately. This should ignite the fireplace and the flame should be a strong, yellow color. If the flame is blue, this may indicate that the gas valve is open too far. Once the logs have ignited and are burning on their own, the gas valve should be closed.

When lighting kindling, be sure to light the paper in three or four evenly spaced locations along the stack. Lightly blowing on the flames or using a bellows to supply oxygen will help the flames to take off and burn in.

Grate Importance

Another important aspect of fire building in an open fireplace is a properly sized grate. The right sized grate will provide for at least two inches of clearance off the floor, also known as a hearth, and six to eight inches from both the back and sidewalls. Without an appropriately sized grate, the fireplace will not be able to establish proper airflow. Improper airflow leads to a fire that doesn't burn as hot and will need more maintenance to keep it going. A fireplace grate will also help to retain the logs in position and prevent them from rolling out of the fireplace as they burn down and shift.

Use High-Quality Wood Only

If you're having trouble starting a fire, the first thing to verify is that you are using properly cured wood. Ideal firewood is generally either a medium or high-density wood that has had an appropriate amount of time to season. This can be checked by attempting to indent it with your fingernail. If it is a medium to high-density wood, little to no indention will be left behind.

The ends of the wood should also have visible cracking. This is a good visual indicator that the wood has achieved a low level of moisture content and is ready to use. Try to find woods like oak, cherry, sycamore, elm, or ash. Just like cherry wood, you can also find applewood and others like sassafras that will give off a great smell when burned. Lack of high-quality fireplace wood often leads to a fire that either burns too slowly or too quickly.

Relative Humidity Inside the Home

Humidity can also be a factor in an unsuccessful fire, even on fireplaces inside the home. It affects the chimney draw, as the rising gases that make a successful fire often have trouble making their way through the dense, humid air. In cases where the humidity is high, use more kindling than normal and ensure the kindling fire is well underway before adding fuel logs.

A Clean Fireplace is a Good Fireplace

Another thing to check when troubleshooting is that the firebox and ash drawer are clean. A thick layer of embers or ash left in a wood stove can clog primary air supplies and material left in an open fireplace just makes cleaning a more arduous task. Taking the time to ensure that large pieces of ember and log material from previous fires is removed will help to ensure a greater success rate with your next fire.

Established Fireplace Draw

A final area of detail when building a fire in an open fireplace is the force of draft or draw. Check the draw by lighting a rolled-up piece of paper and holding it near the open damper to verify that the smoke is drawn up into the chimney. If not, you'll need to figure out why. Warm or windy conditions, an excessively dirty chimney, or blockages can all result in an insufficient draft.

After the fire has burnt out and the embers have cooled, regular cleaning is recommended. Use an ash broom and shovel, after the embers are completely cool, to remove excess ash and dispose of it appropriately in a metal trash can or ash bucket.

For safety, make sure to always use a safety screen. These screens make sure no embers can escape and start fires outside of the fireplace. Only use appropriate fireplace tools when tending the fire as well, including a poker to help make log position adjustments and log tongs for adding additional logs. Also, make sure to open the doors slowly to prevent flash fires due to the sudden change in oxygen levels when opening the doors. Because heat can travel up tool handles easily, it is recommended to use a good set of fireplace gloves when handling metal tools.

How to Start a Fire in a Pre-EPA Wood Stove

If you own an older home, you may have a wood stove, built in fireplace, or insert that was manufactured prior to the establishment of the Environmental Protection Agency's (EPA) ban on older wood stoves in the 1990s. These types of stoves do not contain the air injection systems used by EPA models and are generally easier to start. 

Wood Fuel Sizing

The type of wood needed for a pre-EPA wood stove is the same as used for a traditional open fireplace. Fatwood or similar kindling strips (pine, spruce, or fir) and medium to high density wood logs are ideal. Logs from the nut, fruit, or a similar hardwood species of trees are best. Logs should be at least one inch narrower than the stove's opening. If there is a manual, make sure to check it for recommended wood size or try to research it online by using the manufacturer and model information located on the stove.

Perform Safety Checks

Before lighting, check to make sure the pre-EPA wood stove is in good working condition. This includes making sure you check for:

  • Any potential blockages or debris
  • Making sure all air control wheels work
  • All glass and door gaskets are present and in good shape 

Lighting a Pre-EPA Wood Stove

Pre-EPA stoves utilize either full or partial dampers to help control the burn rate. Some models use wood grates, while others do not.

Start with a wide-open damper and feed doors. Construct a fire with the kindling on the floor or hearth of the stove. Once the kindling fire is lit, close the doors leaving one to two inches open to ensure the smoke is going into the chimney vent. If the smoke doesn't, add more kindling and close the doors a bit further. Do not use a blower, as this causes heat to be pulled away and slows the warming of the stove.

Once the smoke is entering the chimney vent and the kindling is completely engulfed, it is time to add the logs. Start with smaller fuel logs (depending on the size, either one to two or up to three to four). Add more logs gradually once the smaller logs are fully burning. Most pre-EPA wood stoves recommend a side by side pattern for the logs, but front to back may also be used. Once the logs are lit, close and latch the doors. Unlike EPA models, pre-EPA stoves will usually take off immediately and will not require extended startup times.

Maintaining a Fire in a Pre-EPA Wood Stove

The best way to maintain the rate of burn is with the damper and air controls. If kept fully open, your fire will generally burn clean and hot but will need more frequent reloading of wood. If kept partially closed, your fire generally burns cooler in temperature, but for a much longer time. The stove temperature should be monitored at this point with a magnetic thermometer. This method helps you make the appropriate air adjustments.

After the fire is out, make sure to wait 24 hours after the last red ember is visible and empty the ash drawer. Over time, heavy deposits of ash can clog the air inlets which leads to more smoke and inefficient venting.

Other Tips and Solutions to Problems with a Pre-EPA Wood Stove

If you've gone through all the steps of how to build a fire in a wood stove and your fire isn't burning well or not at all, there are a few ways to troubleshoot the problem.

First, check your wood. Damp wood will either burn too slow or not at all. Verify that your wood is dry (check for visible cracking on the cut ends of each log or use a moisture meter). If it is humid outside, use more kindling. The gases rising in the chimney will have a hard time moving past the dense moisture. This leads to too much smoke in the wrong places. Outside temperatures are also a factor. If there is not a sufficient difference between indoor and outdoor temperatures, flue gases will lazily hang in the chimney system, meaning that not enough replacement oxygen is pulled into the firebox to maintain the fire.

How to Start a Fire in an EPA-Approved Wood Stove

Next, let's discuss how to start a fire in a wood stove that is approved by the EPA (such as the ones that can be purchased here).

Wood fuel sizing is the same as a pre-EPA wood stove. Check the manual for any specific preferences, but make sure to use only medium to high density woods. Build all fires as compact as possible. The same rules for building a fire in an EPA-approved wood stove is the exact same as building a fire in a pre-EPA wood stove. You may follow the guidelines above to successfully and correctly use your wood stove.

EPA wood stoves come in two varieties:

Non-catalytic - These stoves are identified by their use of ceramic or fire brick baffles. These baffles seal the combustion chamber top. 

Catalytic - This type of EPA-approved wood stove uses a catalytic combustor matrix to seal the combustion chamber which helps to lower emissions.

Maintaining a Fire in an EPA-Approved Wood Stove

Non-catalytic EPA stoves utilize lightweight ceramic baffles in the ceiling of the stove to contain lightweight particles, preventing them from escaping to the chimney system too early. They do not require dampers and as such, the only adjustment to be made is with the air control lever. As with a pre-EPA stove, a kindling fire must be constructed prior to adding fuel logs. However, the somewhat restrictive nature of the baffles means that the door of the stove must be left cracked open to allow enough oxygen to fuel the fire. This will establish the necessary draft for the hot gases to escape to the chimney. Once this is the case, the door can be closed completely and the stove will burn with just the air supplied through the air control.

How to Start a Wood Fire

Catalytic wood stoves feature a mesh catalyst that allows for the wood fuel to combust at a lower temperature. Initial startup is very similar to a non-catalytic model, however most catalytic stoves feature a bypass damper that allows the flue gases to escape directly to the chimney during the initial firing to ease restriction. Once the kindling fire has had time to combust, small fuel logs can be added, allowed to start combustion, and the bypass damper can be closed. 

How to Start a Wood Fire
Other Tips and Solutions

If your fire isn't lighting, first make sure that the chimney system has been installed correctly (check the manual). All fuel doors and air control levers should be open. An unsuccessful fire could also be the result of a kindling fire that wasn't tightly constructed. The draft created from a hot burn must be strong enough to allow the gases to route around the baffles and enter into the chimney system. This problem is evident if smoke escapes into the room instead of through the chimney.

Final Thoughts 

In closing, no matter what type of stove you have, hopefully, today you've learned something about how to start a fire in a fireplace or stove. All it takes is a little knowledge of what hearth appliance you have, making sure you have the right type and size of wood for the application, and a little patience.

About the Author

Collin Champagne

With over 13 years in the industry, Collin is a National Fireplace Institute (NFI) certified technician and managed content for the eFireplacestore and eCanopy brands. He has achieved the highest NFI certification possible as a Master Hearth Professional and is certified in all three hearth appliance fields: wood, gas, and pellet. With experience with sales and in-field installations, his expertise shines through his technical knowledge and way with words.

Related Articles

Customer Q&A with Product Specialists

Ask a Question