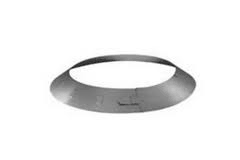
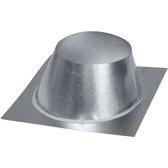
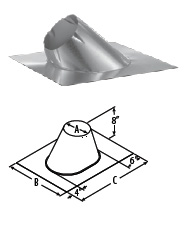
Have Questions About Chimney Flashing?
Looking for the best way to keep your chimney from leaking? Chimney flashing is a key part of keeping rain and snow from seeping in the gaps around your chimney. Without the right flashing, you could lose thousands of dollars to water damage.
"Chimney flashing" is a generic term for any metal or rubber boot used when a vent pipe passes through a roof. It directs water away from the chimney and seals off the gap between the pipe and the roof.
There are different types of flashing for different chimneys, but we'll focus on flashing designed for round metal pipe. This type of flashing has a conical shape that accommodates the round pipe and a flat or angled base that sits flush to the roof. We'll cover the basics including how chimney flashing works and how to select and install the right type.
Chimney flashing protects the structure of a roof at venting exit points for different roof types. The main component of chimney flashing consists of a flat base with a tapered cone. This design provides waterproofing at the exit point of a vent to divert water around the vent and to prevent water intrusion through the hole cut into the roof decking.
The flat base of the chimney flashing is designed to work with certain roof slopes. Each model is made for a certain range of slopes. This allows the flashing to sit flush to the roof even at an angle. It is important to select a flashing that fits the angle of your roof. If it doesn't match the roof's pitch, you won't be able to pass the vent pipe through and still maintain a tight seal.
You'll notice in the diagram below that chimney flashing is one component of a larger venting system. Even though there are other necessary parts, flashing is the most important. An improperly sized flashing allows water to enter the building around the vent pipe. This not only damages the roof, but could deteriorate the framing, drywall, and the appliance being vented.
Water damage repairs can be quite costly, so it's better to make sure it's done right the first time!
To prevent water leaks, chimney flashing works together with a storm collar. A storm collar is a metal band that wraps around the vent pipe right above the cone of the flashing. The storm collar angles away from a pipe at a 45-degree angle. It diverts rainwater that runs down the outer walls of the pipe onto the flashing below.
Vent pipes expand and contract as they heat and cool, both vertically and horizontally. This makes it difficult to achieve a tight seal with the conical flashing. Even if the flashing is properly installed, there will always be a slight gap between the flashing and the actual vent pipe. The storm collar is attached to the outer wall of the vent pipe with a special sealant. Because it is not connected to the flashing or the roof, it is free to move with the vent pipe as it expands and contracts.
The storm collar acts like a hat brim all around the edge of the pipe. It diverts the water away from the pipe and shields the small gap between the edge of the pipe and the flashing.
Selecting the right kind of flashing and installing it properly is vital if you want to keep your roof from leaking. Whether you are installing a new chimney or repairing old flashing, here's what you need to know. We'll start with a discussion of chimney chases since that is the one instance where you will not need conical chimney flashing.
If you have a chimney chase, you won't need a conventional conical chimney flashing. A chimney chase is a structure built around the vent pipe that supports and protects it. It is typically clad in the same veneer material as the rest of the home, such as siding or brick. Since the chimney chase already does the job of enclosing the pipe as it passes through the pitched roof, a conical chimney flashing is no longer needed.
People often ask if a chimney chase is worth the extra cost. Here are several situations that warrant the use of a chimney chase.
You don't need a conical chimney flashing if you have a chimney chase, but you will still need to waterproof the top of the chase. There are a number of components that help waterproof the pipe and chimney chase, but the most important is the metal chimney pan. In addition, you will still need a storm collar and chimney cap.
A metal chimney pan or chase flashing is sized to accommodate the vent pipe and chimney chase. Most are custom made by metal fabricators to exact specifications. (Here at eFireplaceStore.com, we have several sources for these custom chimney pans. Please contact us and we will be happy to help you find and order the right one.)
The pans have a center hole for the pipe to pass through. Around the edges of the hole, the metal is flared upward to make a "fence" or "curb" at the edges of the hole. This keeps water from blowing back into the hole and running down the chimney chase. Separately made fences are sometimes adhered or welded to the pans as well.
Storm collars serve the same purpose with chimney chases as they do with regular chimney flashing. They attach to the pipe and direct water away instead of letting it continue down the pipe into the house. A chimney cap on top of the pipe completes the weatherproofing components.
There are also specialized chimney caps available that contain an internal water barrier or baffle. This baffle prevents water from running down the pipe and eliminates the need for a storm collar. These proprietary caps are usually made for a specific stove and vent pipe and are usually called "chase top caps" as they are sized to cover all or most of the top of a chimney chase.
If your installation doesn't require a chimney chase and all you need is chimney flashing, how do you go about selecting the right one? The process is actually rather simple. While there are some universal flashing on the market, the vast majority are made by certain manufacturers for specific venting systems.
One part that can be a bit confusing is the size of the hole. Chimney flashing is marketed by the inner diameter of the pipe they are designed for. The actual opening at the base will be larger to accommodate the entire vent pipe.
For example, flashing designed for an IHP 8DM chimney system with an 8-inch inner pipe diameter will be large enough to accommodate the 12 ?" outer diameter of the chimney pipe. Even though the flashing is listed for an 8-inch diameter pipe, the actual hole has a diameter of 12 3/4" to fit the entire pipe. It's best to find a flashing designed to fit your venting system to eliminate sizing issues.
Now that we've covered sizing, we'll go over the main options for different types of chimney flashing as well as ways to install each type. Apart from getting the right size for your vent pipe, the main consideration is finding the right flashing for your roof material and slope.
Repair of a damaged chimney flashing is rarely recommended. Flashing repair does not provide a long-term solution to prevent future water leaks near an installed chimney system. Some contractors attempt to repair chimney flashing by hammering out dented areas or screwing on scrap pieces of metal and using lots of sealant. We only recommend resealing storm collars or exposed fasteners and repainting as a maintenance item. Flashing that is severely rusted, malformed, or otherwise damaged should be replaced.
For example, if a tree branch lightly dents or bends the flashing, it's possible to repair it by hammering it flat. Larger repairs such as patches often do more harm than good. Repaired flashing is prone to leaking, and the leaks often go unnoticed until a significant amount of water damage has occurred.
What happens if you are using a universal flashing or need to replace flashing for a vent system that is no longer manufactured? Start by measuring the outer diameter of the vent pipe so you can compare it to the specifications of the new flashing.
While roof flashing is produced as part of a complete venting system, it is possible to find suitable flashing for old systems that are obsolete. All you need to do is find flashing for a different model that matches the right measurements and roof pitch. The opening in the cone should be the same size to ensure proper cooling.
Roof pitch (or slope) tells you how many inches the roof rises for every 12 inches in depth or horizontal run. An example of a roof pitch would be a "6/12 pitch" which means that the roof rises 6 inches for every 12 inches inward towards the peak (or ridge). Take a look at our diagram here to get a better idea of how to measure the roof pitch of your home.
There are two ways to measure roof pitch. The first is from the top of the roof. Mark a level at 12 inches from the end. With the bubble centered in the level vial, measure the distance from 12 inch mark to the roof surface. The measurement from the level to your roof is the "rise" and the 12 inches is your "run".
The second way is to measure from the bottom of the rafters. The concept is still the same, but you can use the underside of the rafters to measure from three different locations. The options include the underside of the rafter on an overhang, the underside of a barge rafter on the gable end, and the underside of a rafter in the attic.
Some chimney flashing installations are more challenging than others. Below is a summary of different installations you may encounter including old and new construction and different roof pitches. We'll go over how to properly install a watertight flashing for each situation.
Cut a hole large enough in all directions to maintain the required clearances around the vent pipe. With the hole cut, lay the flashing down so the cut hole is centered with the hole in the flashing cone. Nail the base of the flashing in place with galvanized roofing nails. All nail heads should be sealed with construction or flashing sealants. When the roof shingles are installed, they should overlap the upper part and sides of the metal base, with only the downward part of the base exposed.
The process for installing the storm collar is the same no matter the venting. To get a proper seal, use flashing adhesive that is rated to the temperature specified by the pipe manufacturer. Follow the steps below to make sure you use the sealant properly for the best possible seal.
Start by test fitting the storm collar against the top of the flashing cone. Once you have it held in the right place, use a marker to trace along the top edge. Slide the collar up and apply a bead of sealant along the line that you marked. Then, push the storm collar back down into the bead of sealant. Sealing along the under edge like this provides better water-proofing than just running a bead around the top. With the collar in position, secure the locking tab or bolt to hold it in place. Apply a second coat of sealant to the top of the collar.
Chimney flashing is very low maintenance. If installed properly and sealed with a high-quality flashing sealant, the flashing will easily last the life of the roof. The only other maintenance is occasionally repainting the flashing, collar, and exposed pipe. Purpose-made flashing and chimney paint is available to match popular roof colors. This paint typically lasts between 10 and 15 years.
Smaller roof flashing (like those meant for pipe systems with up to 6-inch outer diameter) are often small enough to ship via small parcel. Flashing for larger pipes or large base/steep pitch flashing will ship via LTL carrier. Even though they are still relatively lightweight, they are too large for shipment by normal small parcel.
Always inspect any parts you receive before signing off on the shipment. Contact the manufacturer immediately if you notice any defects or missing parts.
Chimneys are a leaky disaster without the right flashing. Taking the time to make sure yours is the correct size and is installed properly is well worth your time! Ideally, you can choose flashing specifically made for your type of venting system.
If you have an old system, you have the option of trying to find another model that is compatible or using a universal flashing. Just make sure you measure carefully and find an option that is rated for your size of vent pipe and the slope of your roof.
If you have questions about chimney flashing, contact our NFI Certified Technicians, and we'll be glad to assist you!
I have a triple wall, non-insulated chimney pipe that is 8" inside and 14" outside. I need flashing for this. Is there anything that might work?